はじめに
VirtualBoxを使用して、CentOS6 またはCentOS 7をインストールした後に、Vagrant用のBoxに変換するための作業について、改めて纏めてみました。

2015年06月07日 18時30分
VirtualBoxを使用して、CentOS6 またはCentOS 7をインストールした後に、Vagrant用のBoxに変換するための作業について、改めて纏めてみました。
作業の前提条件は、下記のとおりです。
| ソフトウエア | バージョン |
|---|---|
| OS | Windows 7 Ultimate 32bit |
| Cygwin | Setup Version 2.831 |
| VirtualBox | 4.3.28 r100309 |
| Vagrant | 1.7.2 |
STEP 1では、Vagrant用に変換したいVirtualBox上の仮想マシンのネットワークインタフェースをブリッジに変更し、VirtualBox Guest AddinのISOイメージをマウントした後、仮想マシンを起動します。
VirtualBox上の仮想マシンのネットワークをブリッジに変更します。
VMNAMEに、変換するVirtualBoxの仮想マシン名または、UUIDを指定します。
VBoxManage modifyvm <VMNAME> --nic1 bridged --cableconnected1 on
VBoxGuestAdditions.isoを仮想マシンに割り当てます。
VBoxManage storageattach <VMNAME> --storagectl IDE --port 0 --device 0 --type dvddrive --medium "C:/Program Files/Oracle/VirtualBox/VBoxGuestAdditions.iso"
VBoxManage startvm <VMNAME>
CentOS 6ではお馴染みのifconfigコマンドが、CentOS 7では非推奨コマンドとなり、インストールされていませんので、取り敢えずnet-toolsパッケージをインストールします。
# yum -y install net-tools
仮想マシンが起動したら、rootでログインした後、ホストOSと同様のネットワークに接続されているかを確認します。
# ifconfig -a
STEP 2では、起動した仮想マシン上でvagrantアカウントの作成、fastestmirror設定、システム更新を行います。
# groupadd vagrant
# useradd -g vagrant -m -d /home/vagrant vagrant
# passwd vagrant
# echo "include_only=.jp" >> /etc/yum/pluginconf.d/fastestmirror.conf
# yum -y update && reboot
STEP 3では、再起動した仮想マシンにホストOS上からSSHで接続してVagrant用の設定を行います。
ホストOSから、仮想マシンにSSHで接続します。
$ ssh vagrant@192.168.0.xx
下記のスクリプトを、実行します。
# SUDO設定
echo 'vagrant ALL=NOPASSWD:ALL' > /etc/sudoers.d/vagrant
chmod 0440 /etc/sudoers.d/vagrant
sed -i '/requiretty/s/^/#/' /etc/sudoers

# SSH設定
mkdir -p ~vagrant/.ssh
curl -ksLo ~vagrant/.ssh/authorized_keys https://raw.github.com/mitchellh/vagrant/master/keys/vagrant.pub
chmod 0700 ~vagrant/.ssh
chmod 0600 ~vagrant/.ssh/authorized_keys
chown -R vagrant:vagrant ~vagrant/.ssh

# SSHD設定
cp -p /etc/ssh/sshd_config /etc/ssh/sshd_config.orig
sed -i -e "/^#RSAAuthentication/s/^#//" -e "/^#PubkeyAuthentication/s/^#//" -e "/^PasswordAuthentication/s/yes/no/" /etc/ssh/sshd_config
service sshd restart

# ネットワークルール設定 (CentOS 6)
sed -i -e "s|/etc/udev/rules.d/70-persistent-net.rules|/dev/null|" /lib/udev/write_net_rules
cp -p /etc/udev/rules.d/70-persistent-net.rules /etc/udev/rules.d/70-persistent-net.rules.orig
grep ^# /etc/udev/rules.d/70-persistent-net.rules.orig > /etc/udev/rules.d/70-persistent-net.rules

# Firewall設定 (CentOS 6)
chkconfig iptables off
chkconfig ip6tables off

# SELinux設定 (CentOS 6)
cp -p /etc/selinux/config /etc/selinux/config.orig
sed -i -e "s|^SELINUX=.*|SELINUX=disabled|" /etc/selinux/config

# bashrc設定
cat <<EOF>>/etc/bashrc

alias cls=clear
alias ls='ls -F'
alias ll='ls -lF'
alias la='ls -aF'
alias h='history 50'
alias off='sync;sync;sync;shutdown -h now'

for i in cp mv rm
do
  alias $i 1> /dev/null 2>& 1
	[ $? -eq 0 ] && unalias $i
done
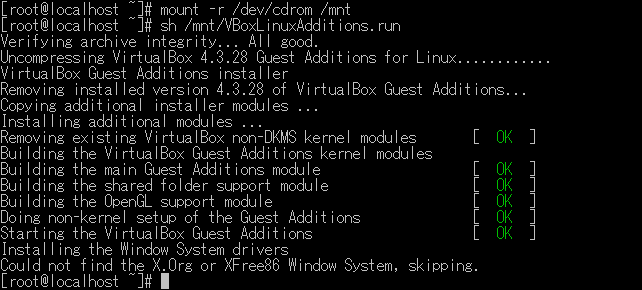
VirtualBox Guest Add-inをビルドします。
yum -y install gcc perl bzip2 kernel-devel kernel-headers
mount -r /dev/cdrom /mnt
sh /mnt/VBoxLinuxAdditions.run
umount /mnt
システムを再起動し、SSH接続を行い起動時のログを確認します。
$ ssh vagrant@192.168.0.xx
$ sudo cat /var/log/boot.log
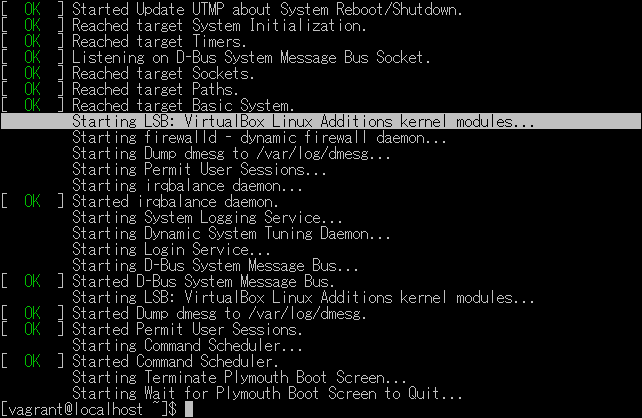
仮想マシンに問題無く接続し、起動時のログでVirtualBox系のサービスの起動が確認できたら、VirtualBoxの仮想マシンイメージをVagrant用に変換するを参考に、Vagrant用のBoxに変換します。